
PART 1: BATHTUB/SHOWER SURROUND
NOTE: (I am posting in parts because I have a homeschooled high schooler and infant aged daycare kids so my time to blog is limited (due to Geometry tutoring and bottle feedings). I do not want to rush through each project because of time constraints so I chose to present this topic in a series of parts. Hopefully you get something out of this – even if it is just inspiration or the courage to try something new. Remember, it is JUST paint. GO FOR IT.)
_______________
You found the perfect piece (shape wise) but hate they way it looks? PAINT IT.
You once loved it as is, but your taste changed and you hunger for a refresh? PAINT IT.
Simply hate it, but can’t afford to replace it? PAINT IT.
Manufactures make paint for anything and everything – and I mean EVERYTHING. Paint is much cheaper than buying a whole new piece so it is a go to makeover method, especially in my house. I love making things pretty but HATE spending tons of money to do so. Before I go ripping things apart, I see if there is a way I can refresh and salvage what I already have to fit my vision before buying new (or other pre-loved items).
In this “series” I will share a few things I have given new life to through the application of paint. Some are large project, others are a quick 30 second jobs.
BATHTUB/SHOWER
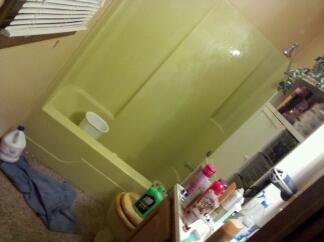
Our 70’s master bath in our house (from 4 years ago) needed a makeover but we were short on funds and knew we would be putting it on the market within the next 6 months to relocate. Selling the home with a gold tub would be a tough sale and replacing the whole unit would cost at least $500! So, we used Rustoleum Tub/Tile epoxy kit (about $40 each) and one afternoon to transform the pathetic looking monstrosity.
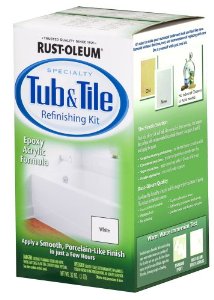
I cannot comment on the long term durability, due to the fact that I only had 6 months to test the results, but after 6 months, the tub still looked brand new and we didn’t have any issues with the product. My husband was the work horse for this project and he is very meticulous and followed the instructions step by step with great care. It did take him the whole day to complete the project (and it REALLy stunk), BUT, it would have taken much longer to rip out and replace the unit so keep that in mind!
Here are the before and after photos:
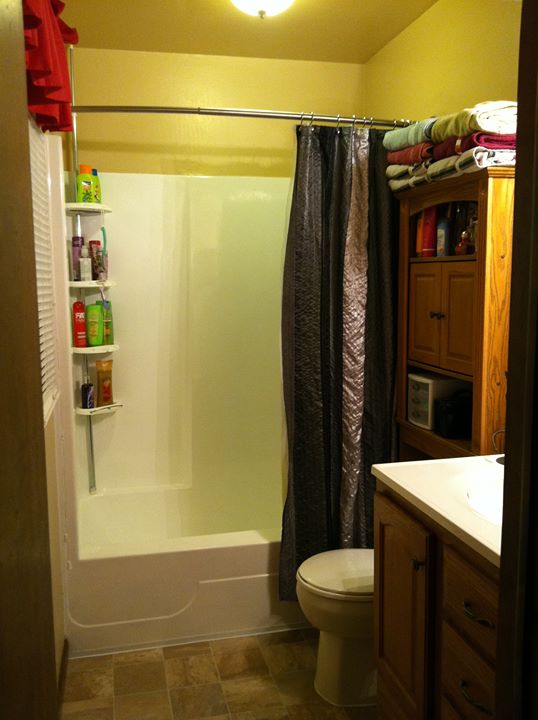
Besides epoxy painting the tub, we bought a new toilet, repainted the walls to a beige with a yellow base (rather than the red based beige which made the room look pinkish – barf), and ripped out the carpeting. (Seriously, who puts carpeting in a bathroom?? Come on builders! That is about as practical as carpet in the dining room!! Carpet does NOT belong in bathrooms and dining rooms!!) We replaced the carpeting with a role of vinyl we bought at Menards in their markdown leftover section (yes, they exist! Check them out!) We used the carpet we tore out (keeping it in tact during removal) as a template to trace and cut our new piece of vinyl flooring then simply glued it to the subfloor. SUPER EASY install.
NOTE: Before buying new, always check clearance sections in a stores home improvement departments AND don’t forget to find your nearest Habitat for Humanity Restore where you can score tile and fixtures, cabinets, flooring, drywall, etc. that were surplus build supplies or pulled out of rehab homes and donated to the store to be reused. I have even seen furniture at Habitat Restores. SHOP AROUND BEFORE YOU BUY. Even one afternoon of shopping around can save a TON of money.
All said and done, we spent about $200 on this entire face lift. I hope the current owners are enjoying their updated on a “dime” master bath.
Have you painted any appliances or fixtures? How did they hold up?
HAPPY NEW YEAR, READERS!! Wishing you all good health and the many blessings of our Lord in the new year.
